Marketing Cloud Tracking Extract: How to Export Your Data
Marketing teams do not work only in Marketing Cloud Engagement. Sooner or later, you will be asked to send opens and clicks to a data warehouse, a BI tool such as Power BI or Tableau, a CRM, or simply to keep a history beyond the platform’s retention periods. The tool built for that is the Tracking Extract.
Tracking extracts provide detailed tracking data meant to be imported into external systems: clicks, bounces, surveys and many other aspects of sends. They can be scheduled in an automation and are delivered as a ZIP file (Tracking Extract).
Why use it? Because it requires no SQL: you tick the data you want. Because it covers every business unit of an Enterprise account in a single file. And because it contains information other tools do not expose as easily, such as subscribers excluded before the send or details of devices and email clients.
In this guide, you will see when to choose the Tracking Extract over Data Views, how to set it up step by step, which files it produces, and the pitfalls that stop an export from ever reaching the server.
Tracking Extract or Data Views: which one to choose?
Both give access to raw events (sends, opens, clicks, bounces), subscriber by subscriber. But they serve different destinations.
| Tracking Extract | Data Views and SQL | |
|---|---|---|
| Where the result goes | Into a ZIP file, then onto an FTP server | Into a data extension, inside Marketing Cloud |
| Skills required | None: you tick the data you want | Writing SQL |
| Period covered | 1, 7, 30, 60 or 90 rolling days, or up to 30 specific days | Up to six months for most Data Views |
| Several business units | Yes, all at once from the Enterprise account | Not for events: one query per business unit |
| Combining with your data | No, the files are raw | Yes, with joins on your data extensions |
| Typical use | Feeding a data warehouse or BI tool, archiving | Targeting, segmenting, building a custom report inside the platform |
In short: if the data needs to leave Marketing Cloud, choose the Tracking Extract. If it needs to work inside Marketing Cloud, for a send or a journey, choose Data Views. The two combine well: a SQL query prepares a data extension, then a Data Extension extract exports it.
How it works: two activities, two steps
A Tracking Extract is not a separate tool: it is a type of Data Extract activity in Automation Studio. The Data Extract activity creates one or more zipped files for use outside Marketing Cloud Engagement (Data Extract Activity). An export goes through these steps:
- The Data Extract activity (Tracking Extract type) generates a ZIP file containing one file per data type ticked: Opens, Clicks, Bounces…
- The file is dropped in the Safehouse, an internal, secure Marketing Cloud storage area you cannot see.
- The File Transfer activity moves the file from the Safehouse to a file transfer location: the Export folder of your Marketing Cloud SFTP, or an external server declared in the account settings.
- Your external tool (ETL, data warehouse, script) picks up the file from the SFTP.
Two prerequisites to check before you start, according to the Salesforce documentation (Data Extract Activity):
- The extract type must be enabled on your account. If Tracking Extract does not appear in the list, ask your Salesforce account executive.
- A file transfer location must be configured in the account settings (Setup > Administration > Data Management > File Locations) before you create the extract.
Setting up a Tracking Extract step by step
Let’s take a common need: dropping yesterday’s opens, clicks and bounces on the SFTP every morning, for a BI tool to pick up.
Step 1: create the Data Extract activity
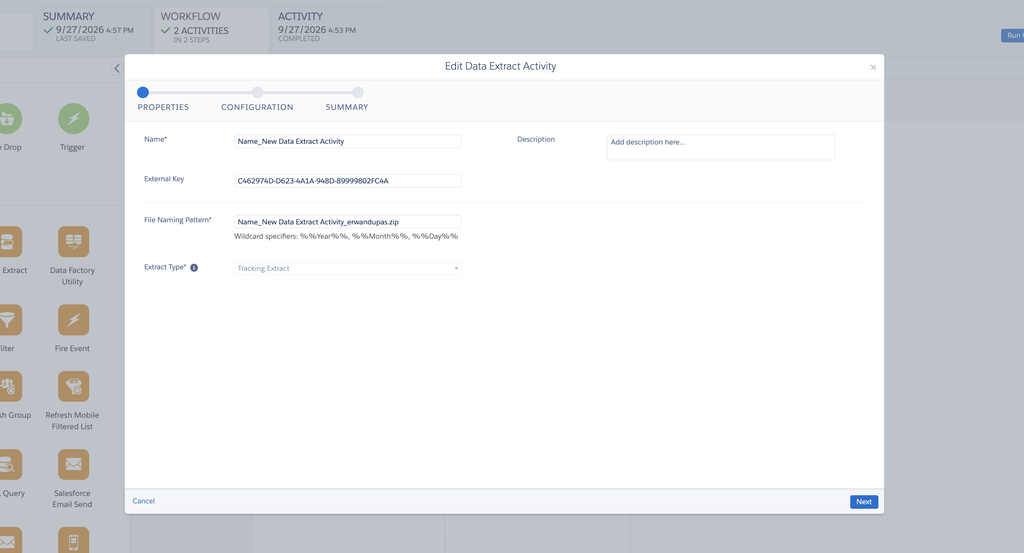
In Automation Studio, Activities tab, click Create Activity, then choose Data Extract. Fill in:
- Name and External Key: an explicit name, for example “Daily Tracking Extract”.
- File Naming Pattern: the name of the output file, which must use the
.zipextension. Add the date with variables, for exampletracking_%%Year%%%%Month%%%%Day%%.zip, so you do not overwrite yesterday’s file. Do not use%%Minute%%or%%Second%%: the File Transfer activity might not find the file (Data Extract Activity). - Extract Type: Tracking Extract.
Below the File Naming Pattern field, the interface lists the available date variables: %%Year%%, %%Month%% and %%Day%%.
Step 2: set the period and scope
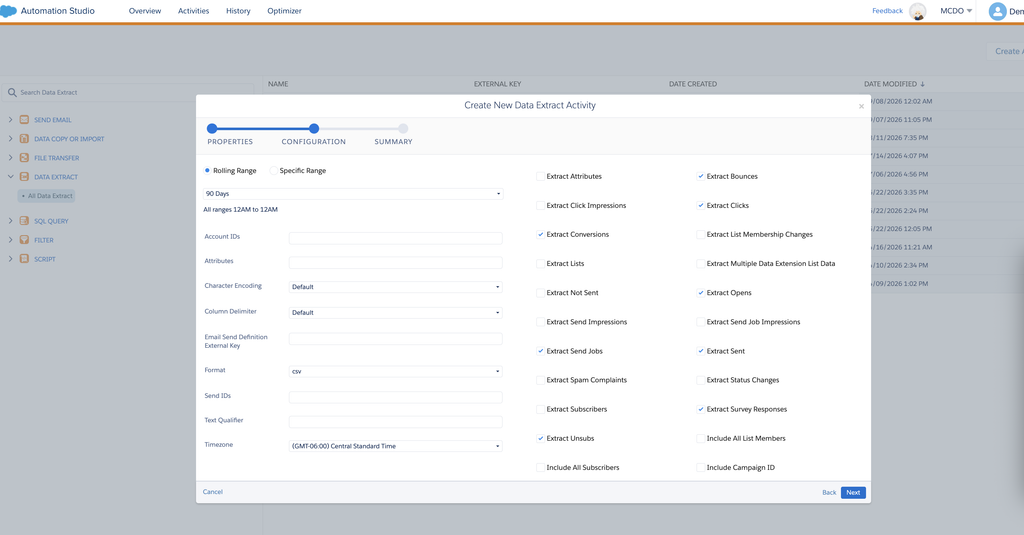
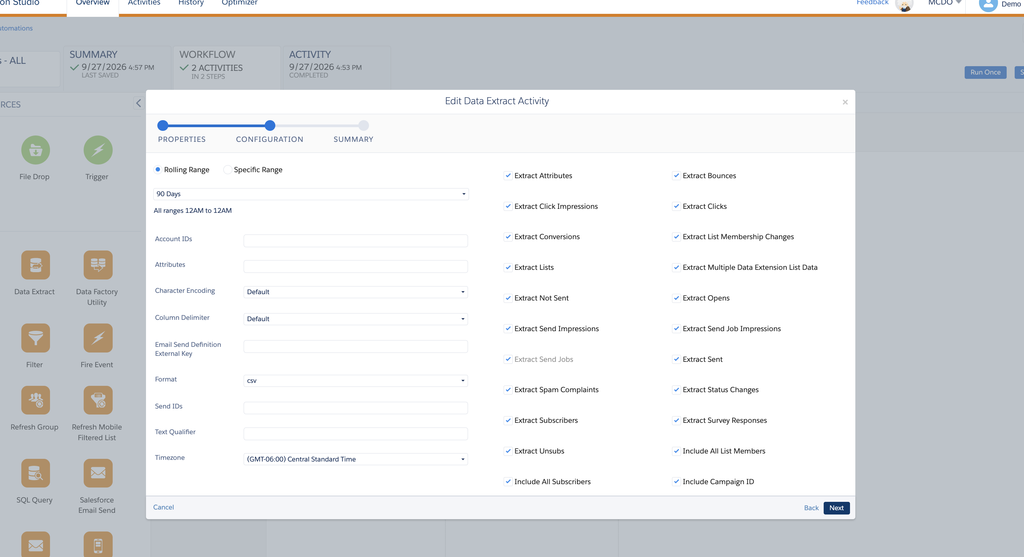
The Configuration screen holds every setting. On the left, the period and the file settings; on the right, the files to export.
| Setting | What to choose |
|---|---|
| Rolling Range | A rolling period of 1, 7, 30, 60 or 90 days, recalculated at each run. For a daily export: 1 day |
| Specific Range | Fixed start and end dates, 30 days at most. Useful for a one-off catch-up |
| Account IDs | Empty for the business unit running the extract, an asterisk (*) for every business unit in the Enterprise account, or a list of IDs (MIDs) |
| Send IDs, Email Send Definition External Key | Optional: limit the export to specific sends or to one triggered send |
| Format | The file format, for example csv |
| Character Encoding, Column Delimiter, Text Qualifier | The encoding, the column separator and the character wrapping text values. Match them to what the receiving tool expects |
| Timezone | The time zone of the dates in the file. Default: (GMT-06:00) Central Standard Time |
Below the period, the interface states that all ranges run from 12 AM to 12 AM. The Salesforce documentation, for its part, says the period ends when the activity starts (Configure a Tracking Extract, Data Extract Activity). During your first test, check the earliest and latest dates in the file to know exactly what is covered.
Step 3: tick the files and options
On the right, tick the files you want: Extract Opens, Extract Clicks, Extract Bounces, Extract Sent, Extract Send Jobs, Extract Unsubs… Each ticked box produces one file in the ZIP; the full list is detailed in the next section. At the bottom of the list, three options change the content:
| Option | Effect |
|---|---|
| Include All Subscribers | Exports every subscriber; unticked, only those with activity matching the exported events are included |
| Include All List Members | Includes every list member in the list-related files |
| Include Campaign ID | Adds a CampaignID column, handy to link sends to a campaign |
The Salesforce documentation mentions other options, which may appear depending on your account: inferred opens (IncludeInferredOpens, where a click with no recorded open counts as an open), browser and device information (Include User Agent Information), and unique metrics added to the Opens and Clicks files (Configure a Tracking Extract, Extract Outputs Reference).
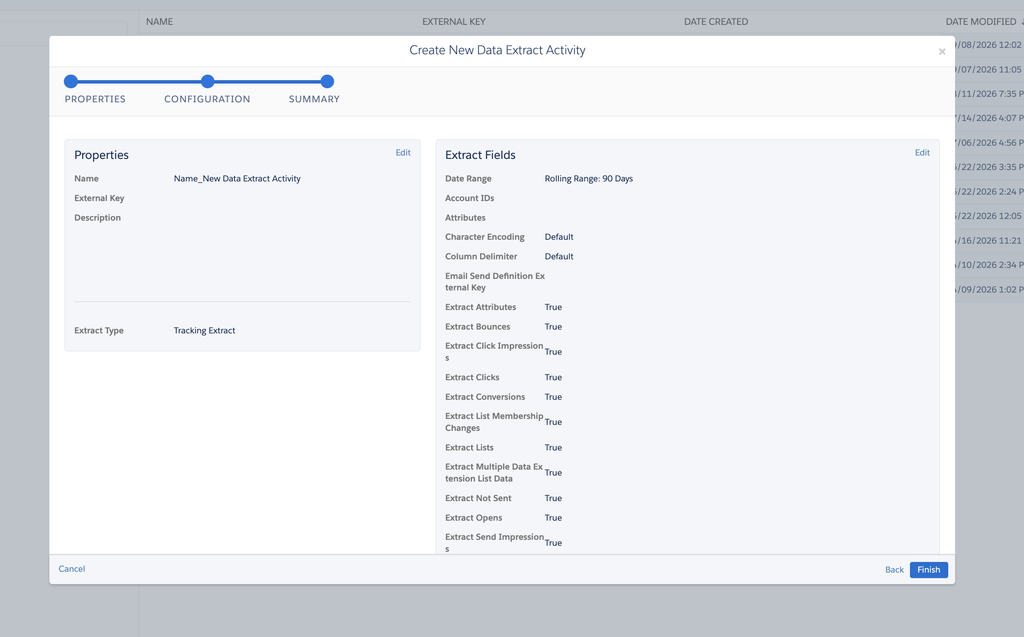
Click Next: the Summary screen recaps the period, the settings and every ticked file (True). Check it, then click Finish.
Step 4: create the File Transfer activity
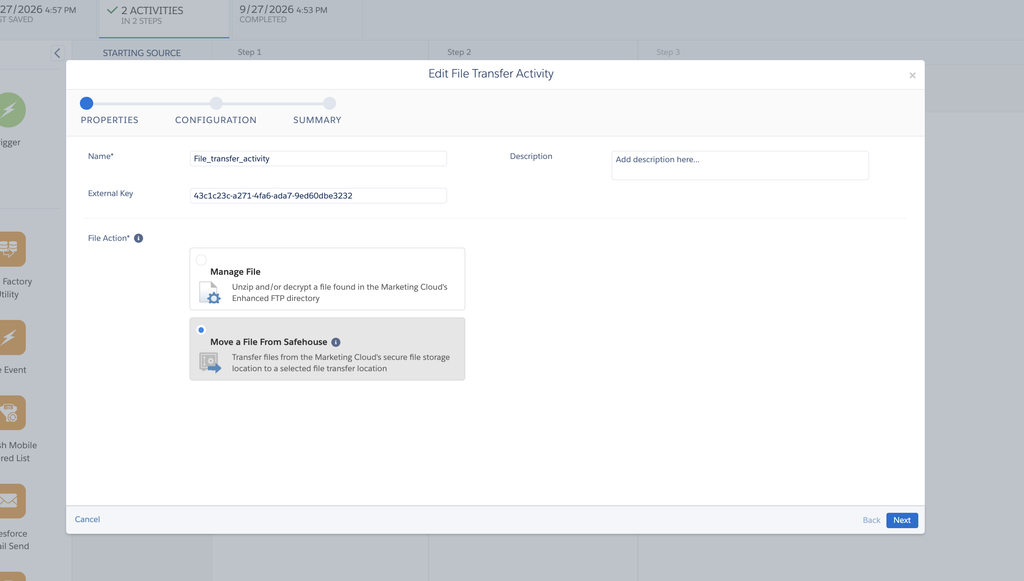
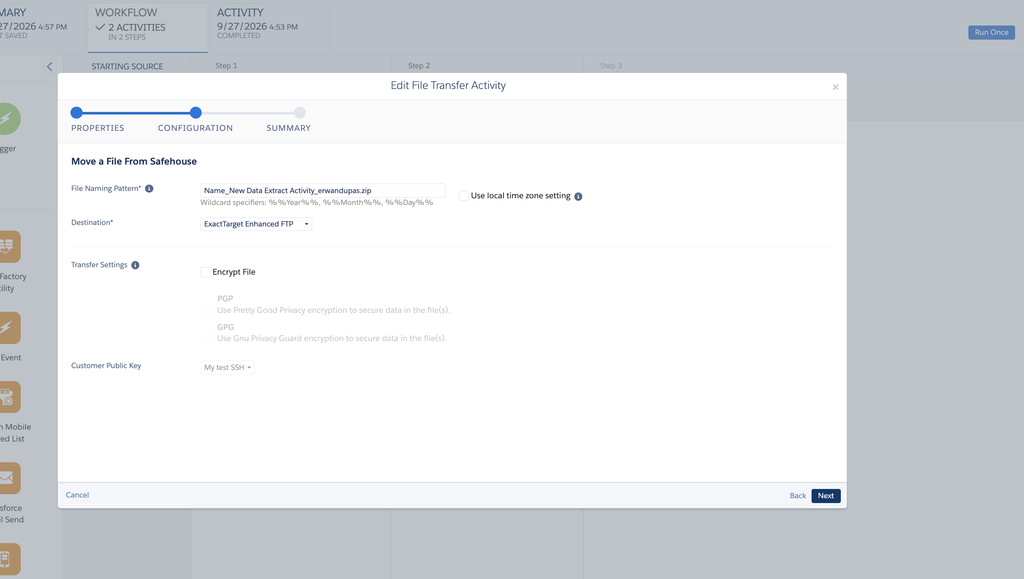
Create a File Transfer activity (How to Use the File Transfer Activity in Automation Studio). In the properties, two actions are available:
- Manage File: unzip or decrypt a file already on the Marketing Cloud Enhanced FTP. Not what we need here.
- Move a File From Safehouse: transfer a file from Marketing Cloud’s secure storage to a file transfer location. This is the option to choose for a Tracking Extract.
On the next screen, fill in:
| Setting | What to choose |
|---|---|
| File Naming Pattern | Exactly the same pattern as in the Data Extract, date variables included |
| Use local time zone setting | Keep it consistent with the Data Extract: a different time zone can change the date calculated in the file name |
| Destination | The file transfer location: for example ExactTarget Enhanced FTP, your Marketing Cloud SFTP, or an external server declared in the account settings |
| Encrypt File | Optional: encrypts the file with PGP or GPG using a public key (Customer Public Key) stored in the account. Recommended if the file goes to an external server |
Step 5: assemble the automation
Create an automation with a scheduled start (Schedule), for example every day at 6:30. Place the Data Extract in step 1 and the File Transfer in step 2, never in the same step: otherwise the transfer would look for the file before the extract has finished (Data Extract Activity).
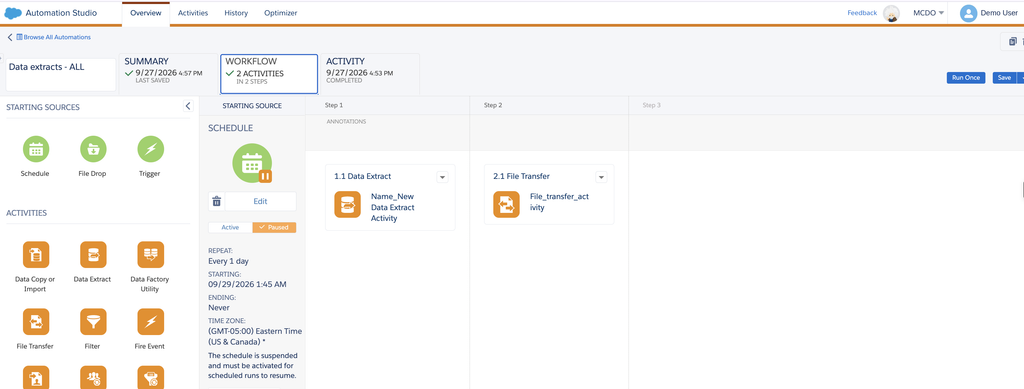
Run a first test with Run Once and check that the file arrives on the SFTP. Then activate the schedule: while it is Paused, Automation Studio shows that the schedule is suspended and scheduled runs will only resume once the automation is set to Active.
The files a Tracking Extract can contain
Each type ticked produces one file in the ZIP, with a header row naming the columns (Tracking Extract Output). Here are the eighteen available files, grouped by use.
Engagement events
| File | What it contains |
|---|---|
| Sent | Every email sent during the period |
| Opens | Every open of an HTML email |
| Clicks | Every click on a link |
| Bounces | All hard and soft bounces in the period |
| Unsubs | Unsubscribes |
| Spam Complaints | Subscribers who reported the email as spam, with domain, send and date |
| Conversions | Conversion events linked to a send |
| Surveys | Responses to surveys included in emails |
Sends and what did not go out
| File | What it contains |
|---|---|
| SendJobs | Sends with activity during the period (not future scheduled sends) |
| NotSent | Messages that did not go out, and why. Note: only the last two months are available |
Subscribers and lists
| File | What it contains |
|---|---|
| Subscribers | Subscribers with a tracking event during the period |
| Attributes | Subscriber attributes in the account |
| StatusChanges | Every change in a subscriber’s status (Active, Held, Unsubscribed…) |
| Lists | The name, description and details of each list |
| ListMembershipChanges | Changes in list membership |
Impressions (dynamic content)
| File | What it contains |
|---|---|
| SendImpression, ClickImpression, SendJobImpression | The same information as Sent, Clicks and SendJobs, plus the impression region: useful to know which dynamic content block was displayed or clicked |
One point sets the Tracking Extract apart from other tools: its data is retrieved before the send runs, and includes subscribers flagged as undeliverable or excluded by List Detective (Tracking Extract).
Download a Tracking Extract example
To see what these files actually look like, here is an example ZIP built from a real Tracking Extract: same file names, same columns, but entirely fictitious data (three sends, about sixty subscribers). It contains Sent, Opens, Clicks, Bounces, Unsubs, NotSent, SendJobs and Subscribers.
When you open it, you will notice that, depending on the options chosen, the Opens and Clicks files contain an IsUnique column, the IP address and an approximate geolocation (country, region, city), and that the NotSent file gives the reason for each excluded subscriber: Held, List Detective Exclusion…
Practical use cases
| Need | Files to tick | Recommended settings |
|---|---|---|
| Feed a data warehouse or a Power BI, Tableau or Looker dashboard every day | Sent, Opens, Clicks, Bounces, Unsubs, SendJobs | Rolling Range 1 day, daily automation, date in the file name |
| Keep a history beyond the 730 days of Tracking and the six months of Data Views | The same files | Daily export archived on your own server |
| Understand why subscribers receive nothing (Held status, invalid address, exclusion) | NotSent, StatusChanges | Rolling Range 7 or 30 days, within the two months available for NotSent |
| Analyze opens and clicks by device and email client | Opens, Clicks | Include User Agent Information option |
| Measure which dynamic content block performs best | SendImpression, ClickImpression | Rolling Range matching the campaign length |
| Track spam complaints by domain | Spam Complaints | Rolling Range 30 days, all business units with the asterisk |
The history case deserves emphasis: since June 16, 2025, engagement data older than 730 days is no longer accessible in Tracking, reports or the SOAP API (Marketing Cloud Engagement, Retention Policy Update). A daily Tracking Extract, set up now, is the simplest way to lose nothing.
Pitfalls to know
The file never reaches the SFTP
This is the most common problem, and it almost always has one of these causes:
- Data Extract and File Transfer are in the same step of the automation. The transfer looks for the file before it exists. Put them in two separate steps.
- The file names do not match. The File Transfer must use exactly the same naming pattern as the Data Extract, variables included.
- The name contains
%%Minute%%or%%Second%%. Between the file’s creation and the transfer, the minute has changed, and the file is no longer found (Data Extract Activity). - The Use local time zone setting option differs between the extract and the transfer. If the automation runs close to midnight, the two activities can calculate a different date for
%%Day%%, and the expected name no longer matches. Schedule the automation away from midnight, or keep the same setting everywhere.
90 days at most per run
A Tracking Extract never goes further back than 90 days with a rolling range, or 30 days with a specific range. To rebuild a longer history, you have to chain several extracts over successive specific ranges, within the data the platform still keeps. And the NotSent file only covers the last two months.
Dates are in Central Standard Time
By default, dates in the files are in Central Standard Time, without daylight saving (Data Extract Activity). The Timezone field on the configuration screen lets you choose another one: set it when you create the activity, and tell the team receiving the files which time zone is used. Otherwise, daily reports will be shifted by several hours.
Duplicates when periods overlap
A 7-day extract run every day contains six days already exported the day before. If the receiving tool stacks the files without deduplicating, opens and clicks will be counted several times. Match the period to the frequency: 1 day for a daily export, 7 days for a weekly one.
Large files
The file size depends on the volume of activity, the number of business units and the data types requested (Tracking Extract). Only export the files you need, and avoid the IncludeAllSubscribers option unless you need it.
Raw numbers are not Tracking numbers
Like Data Views, the Tracking Extract contains every raw event: automatic opens from Apple Mail Privacy Protection, clicks from security bots, repeated opens by the same subscriber. The receiving tool must calculate its own unique metrics, or you can use the Include Unique options.
Which tool should you use next?
| Your need | The right tool |
|---|---|
| Quickly see the results of a send | Email Studio Tracking |
| Receive a ready-to-read report by email, without processing | Analytics Builder standard reports |
| Combine tracking with your data and use it inside Marketing Cloud | Data Views and SQL |
| Visual dashboards over two years, without an external tool | Intelligence Reports for Engagement [to link] |
FAQ: Tracking Extract
What is a Tracking Extract in Marketing Cloud?
A type of Automation Studio Data Extract activity that exports detailed tracking data (sends, opens, clicks, bounces, unsubscribes…) into a ZIP file, meant for external systems.
What period can a Tracking Extract cover?
With a rolling range, 1, 7, 30, 60 or 90 days. With a specific range, 30 days at most. The period ends when the activity starts.
How do I export tracking for every business unit at once?
Run the extract from the Enterprise account and enter an asterisk (*) in the Account IDs field.
Why doesn’t my file reach the SFTP?
Most often, the Data Extract and the File Transfer are in the same automation step, or their file names do not match. Place them in two steps, with exactly the same naming pattern, without minute or second variables.
Why doesn’t Tracking Extract appear in the list of extract types?
Extract types must be enabled on your account. Contact your Salesforce account executive.
What time zone are the file dates in?
By default, Central Standard Time (UTC-6), without daylight saving. You can choose another time zone in the activity’s Timezone field.
Sources: Salesforce documentation
All the information in this article was checked against the Salesforce documentation in September 2026.
Commentaires
Aucun commentaire pour l'instant. Une question, une astuce à partager ? Lancez la discussion.
Pour continuer
Connect the Marketing Cloud Engagement MCP Server to Claude: a Step-by-Step Guide Nouveau
Engagement, Pour débuter
Une question sur ce guide ?
contact@erwandupas.com